How (and why) to boot Windows 11 from a USB flash drive

- Update Time : Thursday, September 18, 2025
- 61 Time
Every Windows PC usually starts from the built-in hard drive, as the term “Windows PC” implies. This is because the Microsoft operating system is not anchored in or with the hardware, but is installed on your storage device.
However, given the right environment, the computer can also be started in other ways: from CD/DVD, via the network and from external data carriers such as USB flash drives. Because flash drives are most important for external booting, our guide focuses on this scenario.
In principle, however, the explanations also apply to other connected storage, such as larger USB hard drives, internal data carriers that are connected via USB cable or adapter, and inserted SD and micro SD cards.
Why boot Windows from a flash drive?
If the PC usually starts with Windows from the hard drive, the question is justified as to why you should boot from a USB stick.
In some cases there are good or even compelling reasons for this. For example, if you bought the computer without Windows, you have to install the operating system first. This can be done easily, quickly and flexibly from a flash drive with customizations. Or if Microsoft’s operating system no longer starts even in safe mode, you can of course reinstall it.
Firstly, however, it is advisable to attempt a repair with a bootable rescue system. The same applies to malware and virus infections as well as accidentally deleted data.
This is because an externally booted, so-called live system also provides access to files that are hidden by Windows or the malware. When recovering data, it is crucial that a live system, unlike Windows, does not overwrite empty hard drive areas without being asked, thereby reducing the chances of recovery.
Booting from a USB stick also helps with system-related operations such as partitioning the system hard drive and cloning the complete system onto a new PC or a larger SSD.
With this tool, all you need to do is confirm the default settings five times, so you don’t have to change anything to configure the setup stick. If it’s so easy, why bother with (a bit of) theory?
In fact, the Media Creation Tool hardly causes any problems. But “how” Windows is installed with it is beyond anyone’s control. However, the way it is installed is crucial for certain functions and is therefore important, as the new system should run as long and error-free as possible.
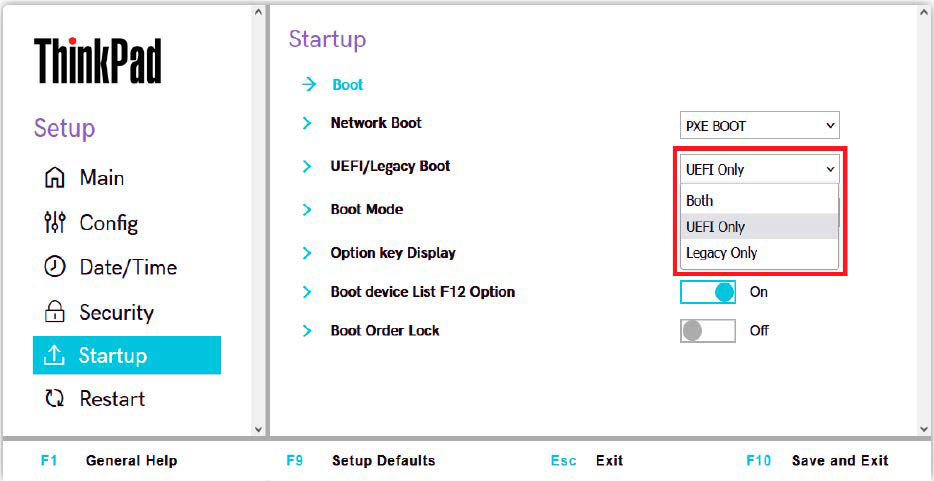
Back to the Windows installation stick. All newer computers have long been working with the modern bios successor Uefi (Unified Extensible Firmware Interface). This interface between the mainboard and other hardware ensures that all components function smoothly.
Two advantages of Uefi over the old bios are the Secure Boot security function and the GPT (Guid Partition Table) partition style of the boot hard disk.
Because the latter is closely linked to starting the computer in true Uefi mode and many computers continue to support the bios compatibility mode, the correct installation and operating mode is crucial.
IDG
However, this is not easy to control, as Uefi has hardly any fixed standards: Sometimes the compatibility mode is called “CSM” (for “Compatibility Support Module”), sometimes “Legacy Bios”, sometimes simply “Legacy”.
Some motherboards even change the boot mode automatically if the Uefi boot fails. In addition, each Uefi menu is structured differently and certain functions cannot always be found immediately – every motherboard and PC manufacturer really does its own thing here.
However, as the Media Creation Tool does not allow any settings for the Windows startup mode, you may only be able to see after installation whether the PC is starting in true Uefi mode and the hard drive is running in GPT partition style.
Rufus – More control during Windows installation
Rufus offers much more configuration control for your Windows setup stick. This is how it works: Insert a USB stick of at least eight GB into the computer and then start Rufus; no installation is required.
At the top of the program interface, you will see the inserted USB flash drive under “Drive”. In the line below, check whether the small black arrow is present on the far right behind “Selection”.
Once everything is set, download the ISO file via “Download”, confirm the storage folder in the next step and wait until the download is complete.
Before you click on the “Start” button straight away, take another look at the program interface: For real Uefi operation, the option “GPT” and to the right of it “Uefi (without CSM)” are correct as “Partition scheme”.
Finally, create the bootable stick by clicking on “Start -‘ OK -‘ OK”.
A stick configured with the option “Uefi (without CSM)” ensures that Windows works in real Uefi mode.
On newer computers, it is usually sufficient to insert the stick, switch on the PC and press the boot selection button displayed on the monitor when starting. Use the arrow keys to select the USB stick and confirm with Enter to start the Windows installation.
If booting from the stick fails, check the boot mode setting in the Uefi menu again and switch to “Uefi” if necessary. Also check that “Secure Boot” is activated.
Tip: You can access the Uefi menu from the Windows operating system by clicking on “System -‘ Recovery -‘ Advanced Boot -‘ Restart Now -‘ Troubleshooting -‘ Advanced Options -‘ UEFI Firmware Settings -‘ Restart” in the Settings app. In Windows 10, “Recovery” is located under “Update and Security” instead of “System”.
Important: There is no single correct boot option for all systems. If a live system does not offer Uefi, select the CSM variant in the Uefi menu of the PC to boot from the special stick.
Many other tools: Balena Etcher, Unetbootin & Co.
There are also a number of other tools for generating bootable USB sticks.
Balena Etcher is characterized by its particularly simple operation. After selecting the ISO file – either saved locally or as a download link – and the flash drive, simply click on the “Flash” button. This is convenient, but nothing can be configured.
The interface of ISO to USB is unadorned, but the program fulfils its purpose.
Unetbootin focuses on different Linux distributions so it’s not recommended for Windows systems.
With Universal USB Installer, the name says it all: In addition to dozens of different Linux variants, the tool offers presets for various anti-virus, rescue and emergency systems. The tool also creates installation sticks for Windows 10 and 11 by selecting the option “Windows 10 or 11 Installer”, not (!) “Windows 10 or 11 on USB”.

IDG
Finally, Universal USB Installer can create multi-boot sticks, i.e. mobile data carriers with several installation or live systems from which you can select the one you want.
Win-USB also supports multi-boot sticks, but here the pre-selection of systems is very limited. We will come back to the multi-boot sticks at the end of this guide.
The prerequisite for creating bootable sticks with all the tools is the ISO file. You can usually download this from the provider’s website and then integrate it into Rufus & Co. Sometimes, however, a Google search is quicker than contacting the software provider itself.
For licensing reasons, not all ISO files can be freely downloaded from the Internet.
This applies, for example, if a live system is not based on Linux, but on Windows PE (Preinstallation Environment) from Microsoft. In these cases, you must first install the Windows software and then generate the ISO file.
The option can usually be found on the software interface under “Tools”, “Tools”, “Boot medium”, “Rescue” or similar. The ISO file is created with just a few mouse clicks and all the components required for Windows PE are then automatically downloaded from the Internet.
Finally, you can generate your boot stick from the finished ISO file using Rufus, for example.
Converting a PC from CSM to UEFI mode
Computers that have long since been upgraded from Windows 7 or 8 to Windows 10 or 11 may still be running in CSM compatibility mode, although true UEFI operation would be possible.
You can check this by typing msinfo in the Run field in the taskbar. If the system overview shows the entry “UEFI” after the “BIOS mode” entry, the PC is running in true Uefi mode.
However, if it says “Previous version”, we recommend changing the system. To do this, check whether the mainboard supports Uefi mode in the Uefi menu as described.

IDG
If this is the case, first convert the system data carrier to the GPT partition style using the MBR2GPT tool integrated in Windows before switching to true Uefi mode.
Multiboot: Packing several live systems onto one USB stick
Reserving separate boot sticks for the many live and installation systems would be confusing and a waste of sticks.
You can avoid both with a multiboot system, where you call up the system of your choice after booting. Ventoy makes it easy to create and configure a multi-boot stick.
To save several systems, select a sufficiently large stick with 16 gigabytes or more storage space if possible. After inserting the stick, start Ventoy and click on “Install -‘ Yes -‘ Yes” on the interface. This step, which is only necessary at the beginning, makes the stick bootable and creates two partitions of different sizes on it.
While the smaller of the two often remains invisible in Windows Explorer, the larger one appears as a normal drive: you copy the ISO files of your choice to this drive. After booting from the stick, the Ventoy interface lists the different boot systems with their file names for selection and starting.
While FAT32 is the appropriate file system for most boot sticks, Ventoy uses exFAT. This also allows ISO files over four GB in size.
Tip: To add or remove a system, add or delete the corresponding ISO file in the Windows file explorer.